


Give Us Victories (GUV) was released in 2022 by Italian game publisher Dissimula Edizioni. It is the third game from designer Sergio Shiavi, whose previous offerings Radetzky’s March and From Salerno to Rome focus on conflicts that took place in Italy. This time Sergio takes us to the U.S. Civil War with a game that is four games in one.
GUV is actually three games in one. The “Main” game covers the 1863 Chancellorsville Campaign that saw the Confederate Army of Northern Virginia (ANV) severely maul the Union Army of the Potomac (AoP). Although the fighting resulted in the death of General “Stonewall” Jackson, Robert E. Lee’s victory at Chancellorsville emboldened him to invade the North, eventually leading to the Battle of Gettysburg. GUV also includes a “Strategical” game and a “Tactical” game, as well as a solo game with AI. My review focuses on the “Main” game.
 Historical Context
 Historical Context
Before getting to the game, let’s take a moment to review the overall situation preceding the Chancellorsville campaign. In December 1862, then commander of the AoP, General Ambrose Burnside, launched a frontal assault on the fortified position known as Marye’s Heights just west of Fredericksburg, VA. Fredericksburg is nearly equidistant between Washington D.C. and the Confederate capital of Richmond, VA. Its capture was vital. Unfortunately, Burnside’s assault was a disaster resulting in over 12,500 Union casualties. This debacle followed numerous other humiliating defeats at the hands of Lee’s ANV.
The AoP’s drubbing at Fredericksburg led President Lincoln to seek a new commander. He would be the fourth commander of the AoP in less than two years. His choice was General Joseph Hooker. Nicknamed “Fighting Joe,” General Hooker was openly critical of past Union commanders. Always bombastic, he was even quoted as saying, “Nothing would go right until we had a dictator, and the sooner the better.” In selecting Hooker as the new commander, Lincoln wrote him:
“I have heard, in such a way as to believe it, of your recently saying that both the Army and the Government needed a Dictator. Of course, it was not for this, but in spite of it, that I have given you the command. Only those generals who gain success can set up dictators. What I now ask of you is military success, and I will risk the dictatorship.”
Lincoln’s handwritten letter is on the back page of the rulebook and concludes with the words “give us victories.”
Hooker’s Plan
Hooker had the good sense not to repeat Burnside’s mistake of launching a frontal assault. Instead, his plan was to fix the ANV in the area around Fredericksburg by positioning four of his corps along the north bank of the Rappahannock north and southeast of Fredericksburg. These deployments were intended to deceive General Lee to his true plans, a flanking maneuver further upstream. Hooker sent three corps west along the north bank of the Rappahannock. They crossed at Kelly’s Ford after constructing a pontoon bridge. They then headed south and crossed the Rapidan River, a tributary of the Rappahannock, at Germanna Ford after building another pontoon bridge. Once across the Rapidan, the plan was for them to move east along the south bank of the Rapidan and Rappahannock to attack Lee’s rear. Faced with envelopment by both wings of Hooker’s army, it was hoped Lee would be forced to retire southward towards Richmond.
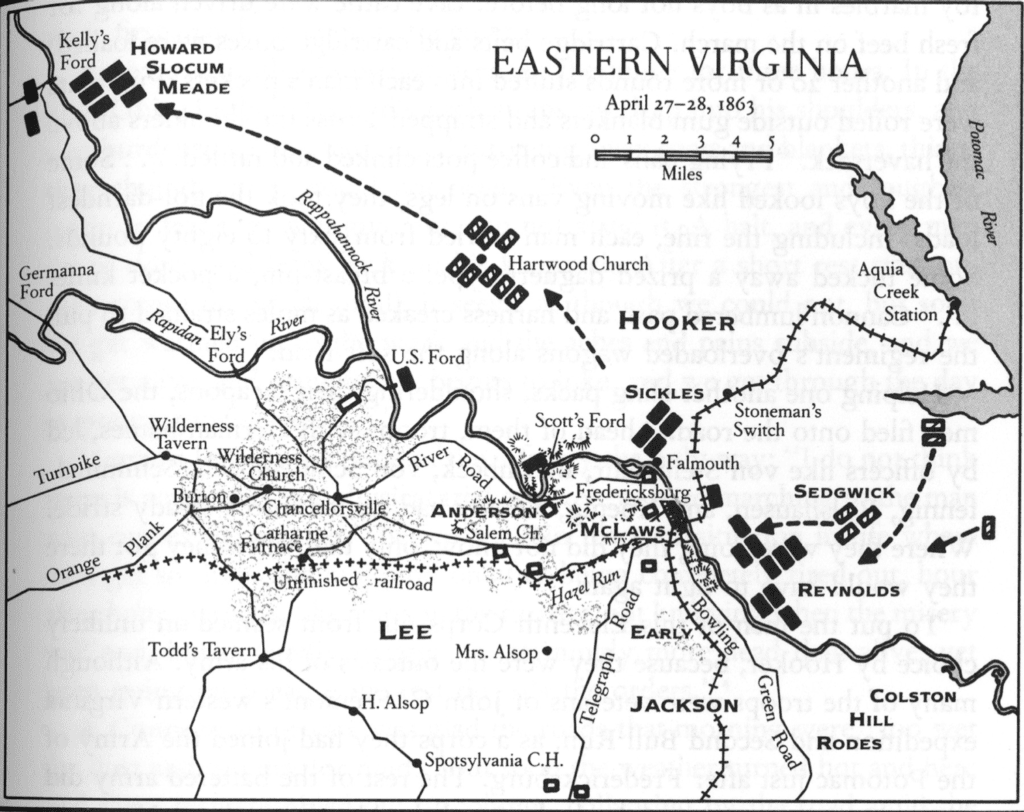
It was a good plan. Unfortunately, the Union army moved too slowly as was frequently the case. Aggressive Confederate cavalry patrols sniffed out the flanking maneuver. In defiance of all military logic, Lee divided his smaller army sending half the army under General Jackson west. With knowledge of the local terrain, guides helped Jackson maneuver to the west of the Union’s flanking forces, thus outflanking the flankers. He launched a textbook attack that rolled up the Union line from west to east, aided by the fact that the Union forces had not dug breastworks. Only the fall of night and Jackson’s wounding by friendly fire ended the Union route.
Game Play
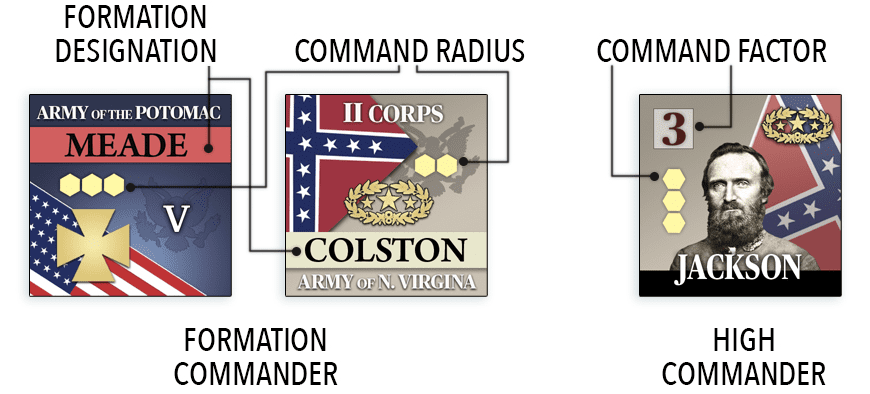
The driving mechanic of GUV’s Main/Campaign game is chit pull. The Turn Record Track (TRT) indicates how many activation points each player can use that turn. Each point can activate a single formation (a Union corps or a Confederate division). However, the 1st, 3rd and 6th corps commanded by generals Reynolds, Sickles, and Sedgwick, respectively, require 2 activation points if any of their respective units have moved south of the Rappahannock (their job was to keep the bulk of the ANV fixed near Fredericksburg). Each player selects which of his command counters they will use and places them into a single cup. As each counter is drawn, it is placed on the map. Given command counters have a limited command range, the counter should be placed near units of that formation. Players can also choose to pass and not activate that formation, but that formation cannot activate anymore that turn.

Each player has higher commanders: General Hooker for the Union, and general Lee, Longstreet, and Jackson for the Confederates. Players can use these higher commanders to activate multiple formations. The player simply takes the command counters from the activation cup and puts them reverse side up in the higher commander’s holding box, and then places the higher commander in the activation cup. The number of formations each higher commander can activate varies. When the higher commander’s counter is drawn, it is placed on the map and activates units up to the maximum number of formations they are allowed within their command range.
Activated units can then move up to their movement point allowance, paying the cost of the terrain in each hex and hex side terrain features they cross. When they move adjacent to an enemy unit, the enemy unit can break contact by retreating one hex. If they have sufficient movement points remaining, the activating player can pursue the retreating unit, who in turn can retreat again. Retreating units cannot retreat if doing so would put them adjacent to another enemy unit.
Combat
If the activated player has units adjacent to enemy units at the conclusion of movement, they can attack. Attacking is not mandatory, but if a unit or stack of units decides to attack, it must attack all adjacent enemy units. The exception is if the attacker occupies a wood hex. In that case they can decide which adjacent hexes to attack and which not to attack. The defender can deploy a skirmish unit – a 1-strength point combat unit – if they wish and there are skirmish units available in their holding box. They can also place breastworks in their hex. Each side then totals up the number of combat points they have and determines the odds ratio, attacker to defender, rounding down if necessary. The result determines how many dice each player will roll. One die is added to this total for both the attacker and defender. Thus, if the odds ratio is 3-to-1 in favor of the attacker, the attacker will roll 4 dice and the defender will roll 2.
The attacker gets to roll their dice first, applying any modifiers (e.g., due to terrain), and each resulting 5 or 6 rolled causes a hit. The defender satisfies each hit by taking a step loss to a unit of their choice. The defender then rolls their dice, applies modifiers, and determines how many hits the attacker must take. The defender must take the first step loss but has the option of retreating all remaining units one hex. Doing so reduces his losses by one. Units must retreat toward their own lines and supply sources and avoid passing next to enemy units. If the defender vacates a hex, the attacker can advance into it with some or all his adjacent units.
If while retreating the defender abandons a breastworks or fortification, all the units become Disorganized. If already Disorganized, they become Demoralized. Disorganized units cannot attack but defend normally. Demoralized units cannot attack, nor can they remain or enter a hex adjacent to an enemy unit. If an enemy unit moves adjacent to them, they must retreat one hex.
Rules are included for artillery bombardment, forced marches, supply, the construction of pontoon bridges, removal or Disorganized and Demoralized markers, and recovery of step losses.
Optional Rules
There are three optional rules included with the main game. The first is the “Rule of 6” which grants the attacker the option of either (1) deciding which defending unit will suffer a step loss or (2) forcing the defender to retreat if they roll an unmodified 6. If the defender rolls an unmodified 6, they can either decide which attacking unit suffers the step loss or cancel a mandatory retreat imposed by the attacker following their roll of a 6. This rule does create additional possibilities, but it is easy to forget in the heat of battle.
Each side has a set of Event markers. At the start of the game, each player randomly draws 3 from a cup, and an additional event each night turn. These events can be played at any time, even during the other player’s turn. The only restriction is that each player is limited to playing two events per turn. These events have a variety of effects that can alter the course of the game. Given that, players should probably agree on whether to use this optional rule.
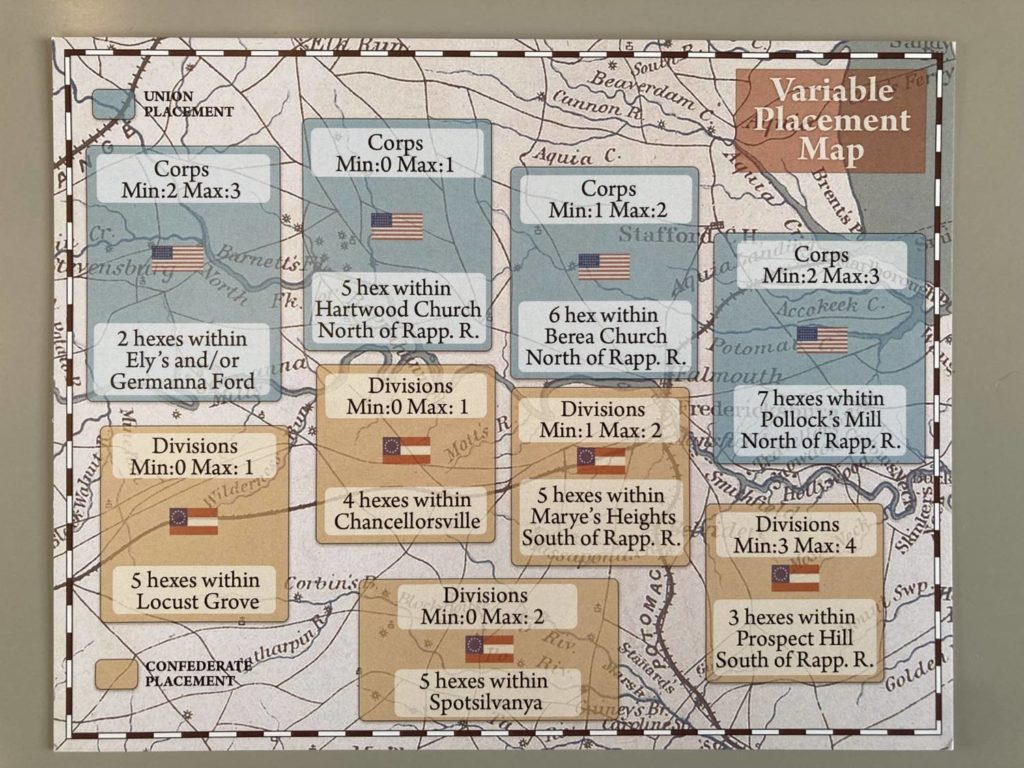
The final optional rule is the most intriguing in my opinion. Rather than using the historical unit set-up, players can opt to use the Variable Placement Map. Before the game begins each player places their command counters, with their reverse side up so as not to indicate which formation it is, in the respective deployment boxes. For example, the Confederate player can place Anderson’s division command counter in the lower left box. This will allow that division to deploy within 5 hexes of Locust Grove. Historically there were no Confederates units in this area. Will their presence alter the outcome of the campaign? Perhaps. This optional rule adds to the replay value of GUV.
Components
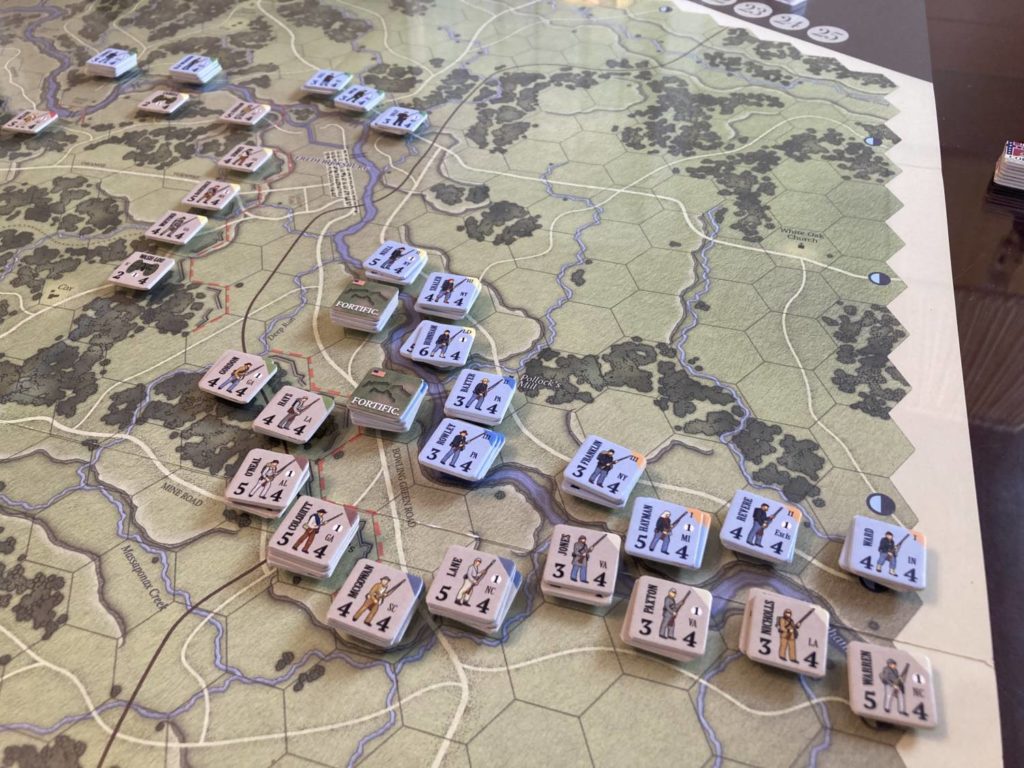
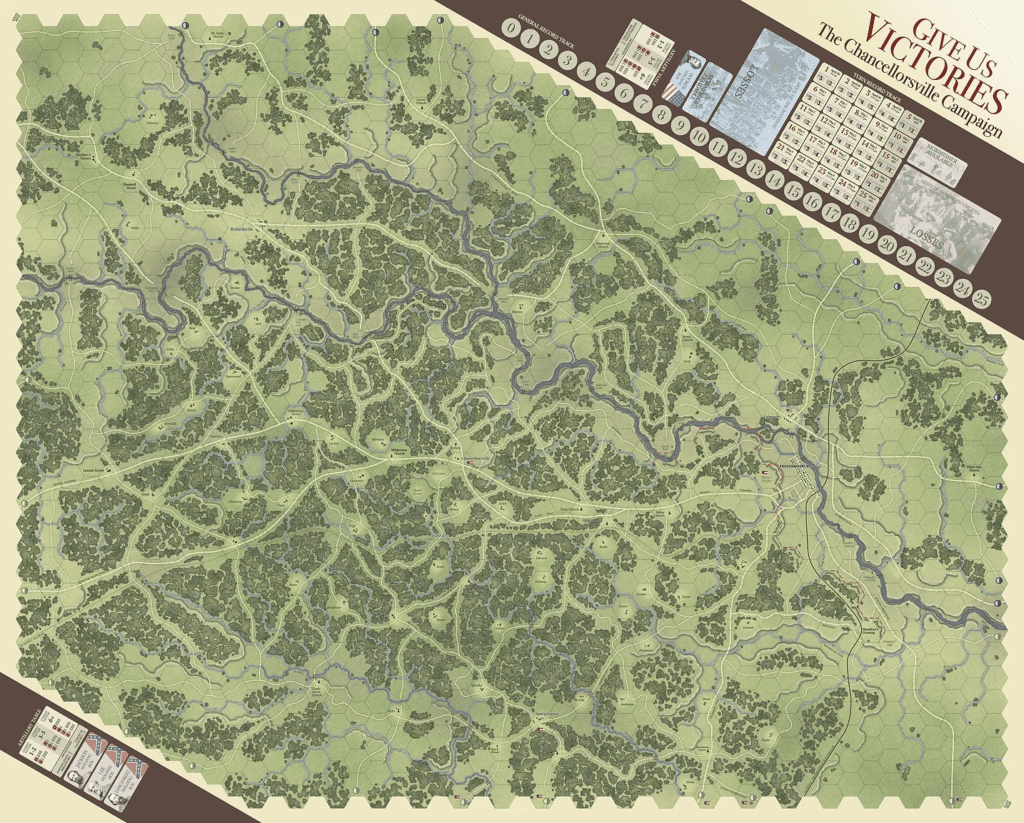
The designer, Sergio Schiavi, did the artwork for the maps and counters. The main game map is as functional as it is pleasing to the eye, and includes several charts, tables, and holding boxes. The main game also comes with several player aids showing the set-up of each scenario and the Terrain Effect Chart.
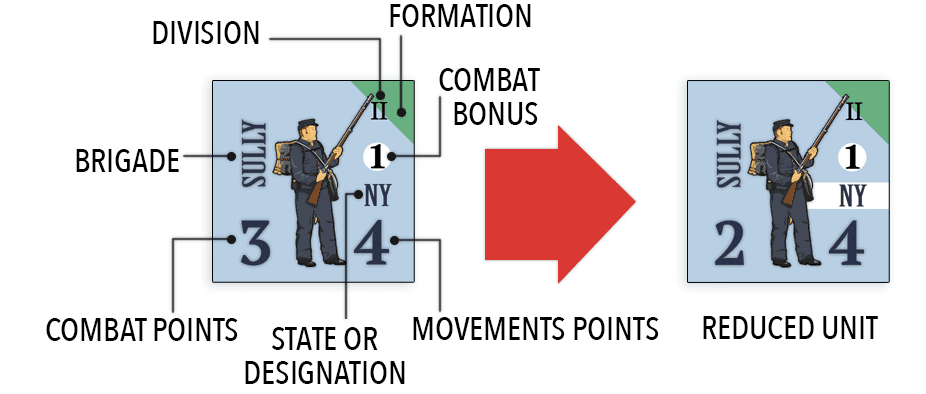
The counter mix includes two sets of combat units, one using NATO symbols and the other silhouettes (as shown below). Players can choose which to play with. The game includes numerous markers for indicating the presence of breastworks, disorganized and demoralized units, pontoon bridges, etc. All the counters are colorful and easy to read.
The 28-page full color rulebook is well organized and copiously illustrated with examples of play. The rules for the main (aka, campaign) game consist of just 12 pages. The remaining pages contain the rules for the strategic, tactical, and solo games, as well as game tips, bibliography, and other information. Although originally written in Italian, the translation to English was done extremely well with only an odd word phrasing here and there.
The box also includes all the materials needed for the strategic, tactical, and solo games. About the only knock I have on the components is the game comes with only three dice when the combat system will usually require more. But if like me you have lots of spare dice laying around, it’s not the end of the world.
Observations and Tips
As expected in any US Civil war game, the fighting can become very attritional, especially when making frontal assaults against fortified positions. The Union suffered over 17,000 casualties and the Confederates nearly 13,000 during the Chancellorsville campaign. Players must not let their losses get out of hand since the difference in eliminated combat strength points is used, in part, to determine victory. If a player loses 24 or more combat points than the other, it is an automatic victory for their opponent. Therefore, players should look to maneuver into an advantageous position that will allow them to attack with numerical superiority and greater odds of inflicting more losses than they will suffer.
Most of the map is covered in forest, which affords advantages to both the attacker and defender. Units occupying woods do not have to attack every adjacent hex, and the number of combat dice is limited to 5 when attacking units in woods. Players should stay in the woods and other beneficial terrain and avoid clear hexes when near the enemy. However, they will need to exploit the road system, especially the major roads which cost only ½ a movement point to enter, to quickly maneuver their formations into a good position from which to attack.
The defending player will have to think long and hard about whether to place breastworks in their hex before an attack. While doing so removes one of the attacker’s dice or forces them to suffer a step loss, retreating from breastworks to reduce a step loss causes all your units to become Disorganized, or worse yet Demoralized. So only place breastworks in key positions that you must hold and from which you can counterattack along with units from nearby hexes during your next activation.
Artillery can be used in normal combat, adding their strength to the other units, but they can also be used to bombard an enemy hex prior to attacking it. After movement is complete, artillery can fire at enemy units 1 or 2 hexes away barring any line-of-sight obstructions. Depending on the die roll, bombarding artillery can result in an enemy unit becoming Disorganized (or Demoralized if already Disorganized) and/or suffering a step loss. This could dramatically change the odds ratio in the ensuing combat phase, and accurately reflects how artillery was used to “soften-up” enemy positions prior to an assault.
Final Thoughts
None of the rules in GUV are very complex, making it relatively easy to learn. The chit-pull mechanism means both players stay engaged, even when it is not their activation. Playing time is 1 to 8 hours depending on the game (main, strategical, or tactical) and scenario being played, so you are not committed to playing a long session. All these factors combine to make this an imminently playable game, even for those new to wargaming.
I especially like the Variable Placement optional rule. It not only adds to the replay value but allows you to explore different “what-if” scenarios. This is one facet of wargaming that attracts grognards to the hobby. Unfortunately, not every wargame provides this kind of opportunity. Kudos to the designer for including it in GUV and permitting players to find unique ways to “give us victories.”


Add Comment